Saturday, 22 October 2016

Stir-fried Chinese Eggplant 鱼香茄子


Recipe adapted from omnivorescookbook.

Ingredients

(A) Grilling eggplant
1-2 long eggplant, cut lengthwise
1-2 tbsp of cooking oil

(B) Sauce
A handful of dried shrimps, pre-soaked
1 tsp of fish sauce
1/2 tbsp of oyster sauce
1 tsp of fermented soya bean, crushed
1 tsp of cooking oil
2 cloves of garlic, minced

Instructions

  1. Cut eggplant lengthwise.
  2. Place eggplant in a large bowl and add water to cover. Add 1 teaspoon salt, mix well. Place a pot lid on top to keep the eggplant under water for 15 minutes. Drain and pat dry.
  3. Sprinkle eggplant with cornstarch and mix by hand, until eggplant is evenly coated with with a thin layer of cornstarch.
  4. Add 1 tablespoon oil in a nonstick pan and heat over medium high heat until warm. Spread eggplant across without overlapping. Grill the eggplant one side at a time until all the surfaces are charred and the eggplant turns soft, approx 2 mins per side (3 sides in total). Transfer to a plate.
  5. Add the 1 tsp of cooking oil, garlic, pre-soaked dried shrimps and fermented soya bean to the pan. Stirfry till fragrant.
  6. Add all the eggplant back into the pan. Stir a few times, add fish sauce and oyster sauce. Toss a few more times. Add some water and stirfry for a minute or two till eggplant is evenly coated with the sauce.
  7. Serve with rice.

Wednesday, 15 June 2016

永珍 Yong Zhen Lor Mee & Prawn Mee

Address: Blk 6 Jalan Bukit Merah, #01-40 ABC Brickworks Market & Food Centre S150006
Hours 08:00-17:30 (closed on Wednesday & Thursday)

Visited 2 May 2016.

We chanced upon this lor mee stall unexpectedly. We had came to ABC Brickworks Market, not knowing what to eat for lunch... except with me telling hb that Amelia told me there's a lot of good food here. So we just randomly tried stalls. Hb and I both love lor mee, and so we tried out this stall and fell in love with it. I think that week alone, we must have ate it thrice! It is must better then the famous Bukit Purmei lor mee... which is famous only for their crispies, their sauce lacks the punch and the flavour. Yong Zhen's lor mee sauce is just awesome... flavourful and yet not too gooey and starchy.

If you are packing this lor mee home, make sure to request for the sauce to be packed separately from the noodles. I feel that soaking the noodles in the hot sauce, overcooks the noodles and makes it too soft.

You can also request for braised eggs, additional ingredients or noodles.

Hb has tried the prawn mee on a separate occasion. It is pretty decent but not mind-blowing like the prawn mee from Zion Road... it's more like your old-school canteen-style prawn mee. Gives you a nostalgic feel like you are back in Primary School.


Hawker Centres - Cleaning

As hawker centres are part of our daily lives, it is somewhat frustrating when you travel all the way to the hawker centre you want, for the food you want, only to be met with disappointment when you realized it's closed for cleaning. Very very frustrating.

When I discovered that there was actually a website that tells you when the hawker centre is closed for cleaning... OMG, it was god-sent! Most most most helpful website. So I must share it with everyone. :)

No more frustrations. No more disappointments. Yippee!

The Beef House

Address: No. 217 Syed Alwi Road S207636
Hours: 09:00-18.00 (closed on Friday)

Visited 23 Apr 2016.

First ate that this place a few years ago. It was my mother-in-law who intro-ed this place to us. It's a stone's throw from the famous Gek Sng Kio Laksa, another of our favourite haunt.

The food here is awesome. We have eaten everything - the abacus seeds, soon kueh, beef noodles and hakka yong tau foo. Prices are very affordable and reasonable.


Yummy soon kueh, sold out even before 12.30pm!

Super good abacus seed.

Bouncy and q beef ball beehoon. It's soooooo good!

Tuesday, 14 June 2016

So wrong...

Spotted on the roads.

Firstly wrong color was a telltale sign. Then a weekend car? Can afford Ferrari but still need subsidies - really? Sent my friend the photo, and her brother said it's fake... Hyundai Tuscani, with Ferrari logo stuck on... I really don't know cos I'm not into cars. What do you think?

Friday, 10 June 2016

Shaped Butter Cookies

Recipe from my ex-colleague, Jessica.


Ingredients
200g plain flour
100g cold unsalted butter, cut into cubes
80g icing sugar
1 egg yolk

Instructions

  1. Preheat oven to 150 deg celcius.
  2. Mix flour and icing sugar well.
  3. Rub butter, flour, icing sugar until mixture resembles bread crumbs.
  4. Add egg yolk and knead until it forms a dough.
  5. Roll out dough until 3mm thickness.
  6. Cut out shape and place on baking paper.
  7. Bake at 150 degrees for 12mins. The cookies will appear pale and not golden brown,
  8. Cool on rack immediately after taken out of oven.
  9. Store in airtight container.


Note:
There is no need to knead the dough excessively, if not cookies will turn out hard.
You can use 2 tbsp of plain flour for dusting to prevent sticking. Or, you can roll the dough between two pieces of baking paper before cutting with a mould.
Add more flour if dough is too sticky.

Thursday, 2 June 2016

Butter Cake


Recipe adapted from Annielicious Food.

Ingredients
250g Salted Butter, room temperature.
4 eggs
40g + 140g Castor Sugar
200g Self raising flour, sifted
60ml Fresh Milk
1 tsp Vanilla Essence (optional)

Instructions

  1. Pre-heat oven at 180C (Conventional).
  2. Prepare a 8 x 8 inch square pan. Line the base, grease the sides.
  3. Separate egg whites & yolk.
  4. Cream butter and 140g sugar until pale and fluffy. Add in Vanilla essence, beat for awhile, and followed by egg yolks one at a time.
  5. Put in half the flour and mix on low speed until incorporated. Add in milk in 2 additions and mix until well incorporated. Mix in balance flour.
  6. Beat egg whites until soft peaks, gradually add 40g sugar and beat until stiff.
  7. Put in half the egg whites in and mix on low speed. Pour the balance egg whits in and FOLD using your spatula.
  8. Bang the mixing bowl a few times to get rid of air bubbles.
  9. Pour batter into pan and level. Bang the pan a few more times.
  10. Bake for 45min or until skewer comes out clean. Adjust accordingly.

Wednesday, 1 June 2016

Pork Congee with Dried Scallops


Yields
4 bowls

Ingredients
500g 五花肉cubed
10 medium sized dried scallops
1 tsp salt
2.5 of water
1 packet of MMMM pork bone stock
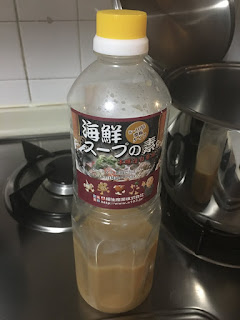
75ml of Nabe seafood soup base
2 cups of rice

Instructions
  1. Rinse 2 cups of rice. Put in the freezer overnight. This breaks down the rice and cuts down the cooking time (learnt from 阿基師 偷呷步).
  2. Cut 五花肉 into 1" cubes. Marinate with 1tsp of salt. Leave aside.
  3. Boil 2.5ltr of water together with 1 packet of MMMM pork bone stock and 75ml of Nabe seafood soup base. Once the soup is boiling, put in the 五花肉 cubes, pre-soaked dried scallops and rice.
  4. Keep stirring till the porridge is thick and smooth.
  5. Switch off the stove and cover the pot for at least 15mins to allow the porridge to thicken.
  6. Scoop and serve with pepper and spring onion.
Note
You can also add salted eggs or century eggs into the porridge.

Wednesday, 18 May 2016

Steamed Egg

Recipe adapted from Angela Chia.

Silky smooth, like 豆花.

Yummy!

Nabe seafood soup base bought from Isetan.

Ingredients
220ml water
30ml Nabe seafood soup base
2 eggs

Instructions

  1. Mix water, soup base and 2 eggs. Strain the mixture using a sieve, so that it will turn out soft and silky after steamed. Pour into a bowl.
  2. Prepare a pot with some water for steaming. Bring to a boil before placing the bowl of egg mixture in.
  3. Steam for 15mins,
  4. Serve hot.

Tuesday, 10 May 2016

Milo Chocolate Chip Cookies

Recipe adapted from Bake for Happy Kids.


Ingredients
125 g unsalted butter, softened
80g light brown sugar
40g caster sugar
1 large egg
1/2 tsp vanilla essence
150g all-purpose flour
1/4 tsp baking powder
1/2 tsp salt
25g Milo
180g chocolate chips

Instructions

  1. Preheat oven to 170°C (fan forced).
  2. Using an electric mixer or a wooden spoon, cream butter, then add both sugars and cream until fluffy. Add eggs and beat slightly, then add vanilla and beat until combined.
  3. Sift flour, baking powder, milo and salt together. Do not discard the larger bits of Milo that are trapped in the sieve and add the bits back to the flour mixture. Add to butter mixture, beating gently until just combined.
  4. Add chocolate chips (keep some to put on the cookie later) and stir in gently.
  5. For a bigger cookie, drop a tablespoonful of cookie dough on the prepared tray with about 3 inches apart from each scoop. For a smaller cookie, drop a teaspoonful of cookie dough on a prepared tray with about 1.5 inches apart from each scoop.
  6. Place more chocolate chips on top of the cookie dough.
  7. If you prefer chewy cookies, bake for about 8 mins. For firmer cookies, bake for around 10 mins.

Sunday, 8 May 2016

Walnut Butter Cake

When I was young, my mom used to order really nice walnut cakes from a home baker.  The cake was very moist and fluffy. My mom will help her colleagues order and orders were always large. The auntie will spend hours the day before baking. The funny thing is my mom never met the auntie before, only my dad has seen her before, as he is the one who goes to collect the cakes. I can't remember when, but eventually the auntie stopped taking orders, but will still give us walnut cakes every CNY... but we didn't have walnut cakes as often. That eventually stopped too. The ones from Bengawan Solo were too oily, and couldn't match up. My parents tried to get the nearby bakery to bake walnut cake but somehow, it just doesn't seem to be the same... probably cos they have to sell cheap (or else no one will buy) and compromised on quality. And that is why I have always wanted to bake a walnut cake when I first started baking. I went through a few websites and finally settled on two... tried to combine the two and also add what I knew about the famous Mrs Ng's butter cake.

Recipe adapted from My Baking Cottage and Guai Shu Shu.


8-inch pan

Ingredients
250g Butter
140g caster sugar
4 eggs, separated
200g plain flour
4g baking powder
30g chocolate chips
150g walnuts, toasted and finely chopped
80g milk

Instructions

  1. Prepare and line a 8-inch square pan.
  2. Lightly toast in an oven for about 5 minutes. Use Turbo Chopper and chop finely (with some bigger pieces is ok).
  3. Sift flour and baking powder. Set aside.
  4. In a large mixing bowl, cream slightly softened butter with half of the sugar (70g) using an electric beater until light and fluffy.
  5. Add egg yolks, one by one and cream and cream till well mixed.
  6. Put in half the flour and mix on low speed until incorporated. Add in milk in 2 additions and mix until well incorporated. Mix in balance flour.
  7. In another mixing bowl, beat egg whites using an electric beater until soft peaks. Add the other half of the sugar (70g) slowly and continue beating until the egg white reaches stiff peaks (when you lift the beater, the tip droop slightly, and beaten egg whites becomes stiff and shiny).
  8. Add toasted nuts and chocolate chips into the cake batter.
  9. Fold in beaten egg whites into the cake batter, in two to three additons, until egg whites is well-incorporated into the batter.
  10. Pour batter into prepared pan. Bake in preheated oven at 160C for about 50 minutes.
Note:
  • I had wanted to get a 7-inch pan, but wasn't able to buy one. The 8-inch pan yields quite a short cake, but it was still ok for me. The first time I baked this, I used a 9-inch pan and it was OMG short!
  • I tried out chopping 150g walnut into quarters - too big. Then I tried having half finely chopped and half quartered - still too rough. Finally I tried 150g finely chopped - perfect! My mom and hb doesn't like walnuts that are too big and totally loved the finely chopped version. My MIL on the other hand, prefer having the bigger walnuts. I personally liked the finely chopped version... so bite but not too much.
  • Some found the cake a bit sweet, but it is because of the chocolate chip... so no real control on that. Not a choice to leave the chocolate chip out, as it tastes good in the cake.
I baked this for Mothers' Day today - well received by the adults and kids. :)

Thursday, 5 May 2016

Egg Shell Fertilizer

Since I am starting to cook more, and bake more, I find that I use a lot of eggs nowadays. It is such a waste to just throw away the shells, so I decided to make egg shell fertilizer.

Collect the egg shells, wash and leave them to dry for a few days.

Crush the egg shells lightly.

Use a roller pin to crush the egg shells further

Finely crushed egg shells, ready to be used. Just sprinkle onto the soil.

Restoran Kak Kak 佳佳点心茶楼

Address: No. 9, Jalan Maju, Taman Maju, Johor Bahru
Hours: 5:00 - 12:00 (closed on Tuesday)

Visited on 4 May 2016.

Wanted to go to our beloved 果条仔 stall, but they were closed cos it's Wednesday. Alas, no way to satisfy the craving. Anyway, this gave us a good chance to try something new. I remembered there is a dim sum place near Pelangi, so went back to the car to look at the map. We asked a nearby bookshop (where we bought parking coupons from) and realized Kak Kak was just a few shops away!

Oh on the part about the parking coupons, the bookshop owner told us last month that we didn't have to put any coupons cos the government hadn't printed or distributed the new ones, so don't need to put for the entire month of April. Apparently the coupons came yesterday and it was sold out really quickly, and the first two weeks of May, we don't need to display the coupons.

Back to dim sum. So we found a seat at Kak Kak, and started ordering.

Very yummy fried carrot cake, soft in the inside but oh-so-crispy on the outside. Though this is nice, I would say the one we had at Chang Man was definitely better.

Beancurd skin with fish cake... ok only.

Chicken feet... taste was ok only.

Pork ribs. This was super duper nice, the meat was well marinated and very 入味.

Siew mai, bite size and really good.

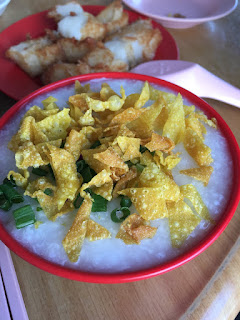
皮蛋粥. It was different from the ones we eat in Singapore, but very nice... I think they put one whole salted egg in!

The lo mai kai is the best! The glutinous rice was very fragrant and tasted really great!


Total damage for 2 cups of tea and this spread only cost us RM$25.

Wednesday, 4 May 2016

The Little Island - Penang Delight

Address: 56, Jalan Sutera Tanjung 8/3, Taman Sutera Utama, Johor Bahru
Facebook: https://www.facebook.com/pages/The-Little-Island-Sutera/1581168538829964

Visited on 4 May 2016.

After massage at 古泉 at Sutera, we chanced upon this little eatery and decided to drop in for lunch as it was getting late.


The menu looks pretty simple and interesting. I ordered the White Mee Siam with Ayam Merah and hb ordered the Penang Prawn noodles. Food was pretty decent and not too expensive.


On The Way to Austin Heights

Spotted this beautiful cloud on the drive to Austin Heights.


So much beauty around when you stop and look.

More Penang Food

Address: Near Uncle Tetsu, No 47, Jalan Austin Height 3, Taman Mount Austin, 81100 Johor Bahru
Hours: Evening time (closed every Tuesday)

Somehow or rather, we just love the Penang food in Johor. When we walked past this stall the last time we were there with Fiona and Audrey, and despite being super full, hb still had a bowl of prawn mee and Fiona a bowl of assam laksa... 我们就对这间小吃念念不忘. And so here we were, here for dinner. It is just a mobile foodstall, parked outside Uncle Tetsu.


Penang Prawn Noodles, fragrant and yummy.

Assam Laksa full of oompfh, spicy and sour... typing this makes me salivate!

Ice kachang, not fantastic. Just sweet and full of syrup taste. The roasted sunflower seeds was interesting though.

Tuesday, 3 May 2016

Vacuum Sealing Without Using a Vacuum Sealer

Hubby has been asking me to bulk shop for meats and freeze them, as I am starting to cook more nowadays. He feels it's a waste of time to go to the market every day, when I should go once or twice a week, to make more efficient use of my time.

Point taken.

Today we went to the wet market and bought 3 kg of pork, 6 chicken legs (drum + thigh), a dollar worth of chicken gizzards and half a kilo of fresh prawns. As I was preparing to pack the food... I was thinking how great if I had a lot of freezermate, which isn't really that practical monetary wise. Suddenly I recalled a life hack I saw on FB some time ago - to vacuum seal without using a vacuum sealer.

Must try it out. So armed with a container of water and ziploc bags, I tried out the life hack and ZOMG it worked... not exactly 100% vacuum sealed like with a machine but good enough. A cheaper and yet efficient method.

Put the meat in the ziploc bag, close till there is a 1"-2" gap. Place the ziploc bag into the container of water, and close properly. Make sure water doesn't get into the bag.

Vacuum sealed chicken legs.

Vacuum sealed minced pork.

Vacuum sealed chicken gizzards.

All packed and ready to be frozen. :)

Sunday, 24 April 2016

Fried Shallots using Microwave

No, you didn't see it wrongly... this recipe is for making fried shallots with a microwave. It's very easy and convenient, and best of all, no splatters or oily kitchen!

Recipe adapted from Blessed Homemaker.

Ingredients
Sliced shallots
Cooking oil
Salt

Directions
  1. Put the sliced shallots in a Corelle microwavable bowl.
  2. Pour cooking oil and make sure the oil covers the shallots. Give the shallots a good stir to make sure the oil coats all.
  3. Put the shallots and oil mixture into the microwave, microwave on high for 5 minutes if using about 20 shallots. Open the microwave and check the shallots. Give it a stir, and microwave for another 3 minutes. Keep checking and decrease the microwave timing gradually until the shallots are a light golden brown. Usually 5 minutes, 3 minutes, 2 minutes, 1 minute, 30 sec.
  4. Once the shallots look light golden brown, take out from the microwave, put 2-3 pinches of salt and give the mixture a good stir. The shallots will continue frying in the hot oil. Be careful not to scald yourself.
  5. Once it reaches a nice golden brown, drain using a strainer.
  6. Use scotts towel to absort the excess oil from the fried shallots. Once cooled down, store in a airtight glass container.
  7. Put the cooled down oil into a glass bottle. This can be used for stir-frying.

Oil just covering the shallots.

After microwaving for 5mins.

After another 4mins - I split into 2mins each and check.

After another 2 minutes, light golden brown. I split into 1min, 30sec and 10sec.

Golden brown.

Sieve and drain.


Put the fried shallots on scotts towel to get rid of excess oil. Once cool, store in a glass air-tight bottle.

Shallots infused oil... very fragrant.

Kept in a glass bottle for stir-frying. :)